AU Ford Falcon - SPUD Project


12V Accessory Power Source (Cigarette Lighter) information on the 12V accessory plug (cigarette lighter socket). Applies to EA/EB/ED/EF/EL/AU/BA/BF Falcons and SX/SY Territory models Antilock Braking System (ABS) Antilock Braking System (ABS) information Air Conditioner Controls - Series 1 air Conditioner controls repair information (Series 1 only) Accessory plug Information on the Mobile Office pack accessory plug. Also relevant to the BA/BF/FG Falcons and SX/SY/SZ Territorys Alternator Alternator Information Body Control Module (BCM) Body Control Model (BCM) information Digital Clock Information on the basic clock available on all low models Brake Switch brake switch replacement Reading Vehicle Identification Plate (Build Plate) Codes - How to read Vehicle Identification Plate A.K.A. build plate codes Crankshaft Angle Sensor basic information on the Crankshaft Angle Sensor, or CAS. Cabin Fuse Panel in-depth information on the continuity and functionality of the interior cabin fuse box PCM Catch Codes PCM Catch code information Centre Console Buttons accessory buttons (e.g. TCS, ABS, ANT.) information and pinouts Disassembling the Instrument Cluster Insturment Cluster Disassembly Manufacturer Specific Instructions - CodeEzy Keyfob cloning instructions using a CodeEzy branded universal keyfob (Smartlock only) Common Faults common faults Credits Credits DTCs DTC (A.K.A Diagnostic Trouble Codes), and other relevant ECU/PCM Information Disclaimer Disclaimer for information present on website Door Lock Actuators repair and replacement information for the door lock actuators. Also relevant for BA/BF Falcons and SX/SY Territorys Door Scuff Plates Information on the replacement of the door scuff plates. Also includes replacement of AU Falcon scuff plates with BA/BF equivalents Interior Driver Buttons information on driver-side console buttons (Lock/Boot/Fuel) Engine Number engine number information and location Exterior Door Handles Information on the replacement of the exterior door handles. Also relevant to the BA/BF Falcons and SX/SY Territorys External Mirror Controller Information on the electric mirror switch controller Factory Maintenance Schedule Ford Australia recommended service intervals Factory Specifications Factory Specifications fuel filter replacement Fuel Injectors fuel injector diagnosis and replacement Fuel Pressure Regulator Fuel Pressure Regulator replacement steps. applicable to BA/BF/FG/FGX Falcons and SX/SY/SZ Territory models (I6 only) Fuses & Relays fuse information and minimum viable fuses, including diagrams and parts tables Headlight Switches headlight switch controls information and pinouts Head Unit Head Unit information Bench Testing the Instrument Cluster Bench testing information for the instrument cluster Idle Speed Controller (ISC) Idle Speed Controller Information Ignition Coil Pack ignition coil pack information, including replacement and testing information Instrument Cluster instrument cluster information and special functions Interior Mirror information and removal and replacement information for the interior mirror. Also relevant to the BA/BF/FG Falcons and SX/SY/SZ Territorys Manufacturer Specific Instructions - KEYDIY keyfob cloning instructions using a KEYDIY branded keyfob and programmer Central Locking Keyfobs central locking and Central Locking keyfob information Component lifespans - Educated guess lifespans for common maintenance components. Likely partially useful for various models of vehicle Miscellaneous Notes - Uncategorized notes not requiring a dedicated page PCM PCM (ECU equivalent) location and general information PCV PCV information and replacement instructions Parts Sharing - (partial) list of shared parts from Ford Falcons XA/XB/XC/XD/XE/XF/XG/XH/EA/EB/EF/EL/AU/BA/BF/FG/FGX, and Ford Territory SX/SY/SZ Passenger Airbag Passenger airbag removal instructions Instrument Cluster Bench-Testing Logs a running log of tested instrument cluster pinouts, using wrecker-sourced parts Premium Audio System Premium Audio Information Rear Lights Connector tail light/rear light assembly plug information Registered AU Falcon Information Ford Falcon AU Census Information Table Relays - General Information types of relays (general information) Manufacturer Specific Instructions - Remocon Keyfob cloning instructions using a Remocon branded keyfob and programmer (Smartlock only) Roof Racks roof rack installation methods and information Seatbelts replacement and repair instructions for seatbelts and B-Pillar Seatbelt trims. Partially useful for the BA/BF Falcons and SX/SY Territory models Series Information Series specifics information Sparkplugs spark plugs information and replacement instructions Speakers Speaker installation and wiring information. Partially applies to BA-BF Falcons and SX-SY Territory models Speedometer Reading Calculator interactive calculator for changing of speedometer reading based on transmission driven gear, diff ratio, and wheel size. Changing Differential Ratios and Tyre Sizes calculations required for changing of speedometer reading based on transmission driven gear, diff ratio, and wheel size. Steering Wheel Controls steering wheel Cruise Control and Media Control assembly information, pinout, and 3D printable model Thermo Fan Thermo fan removal instructions Thermostat thermostat replacement instructions PCM Relearn PCM Relearn procedure Reading the Tickford Vehicle Engineering (TVE) Plates - How to read the Tickford Vehicle Engineering (TVE) Plates Trailer Auxiliary plug towbar trailer connector information, including instructions on how to wire a custom trailer plug (if required). Partially applicable to BA-BF Falcons and SX-SZ Territorys Tyre Size Calculator Generic Tyre Size Calculator Reading the Vehicle Identification Number (VIN) Plate how to read and decode the VIN number and engine number Ford Falcon AU VIN Decoder Ford Falcon AU Interactive VIN Decoder Verification Letters how to get an official Ford Verification Letter. Will work with other similar models Station Wagon Exterior C-Pillar Trim Station wagon exterior C-Pillar trim information and 3D printable model. Also compatible with BA, BAII, BF, BFII and BFIII station wagons Rear Bumper (Wagon Body) removal of the rear bumper of a Wagon body vehicle Wheels & Tyres information on the tyre sizes and brake dust covers. also includes general information on calculating tyre size from a tyre size Premium Audio Custom Installation Sedan audio upgrade - 6x9” Speakers Centre Dash Ashtray Wheel Centre Caps

Rear Bumper (Wagon Body)

Rear Bumper (Wagon Body)

Instructions for the removal of the rear bumper can be found below

This section is not related to SPUD as it is a Sedan body type, but this has been created using an associated vehicle, Roadkill. Despite being a later model, these instructions should work without issue on AU Falcon Wagons

  1. Locate the scrivets in the rear mudguards and remove. Repeat this step on both sides of the vehicle

    Scrivets in this area of the car have been exposed to the elements and may prove impossible to remove non-destructively. Please ensure you have spare scrivets or another mounting solution for replacement as needed. The remaining scrivets may be removed if needed but most people’s hands can fit in the gap made by removing the 4 circled scrivets below
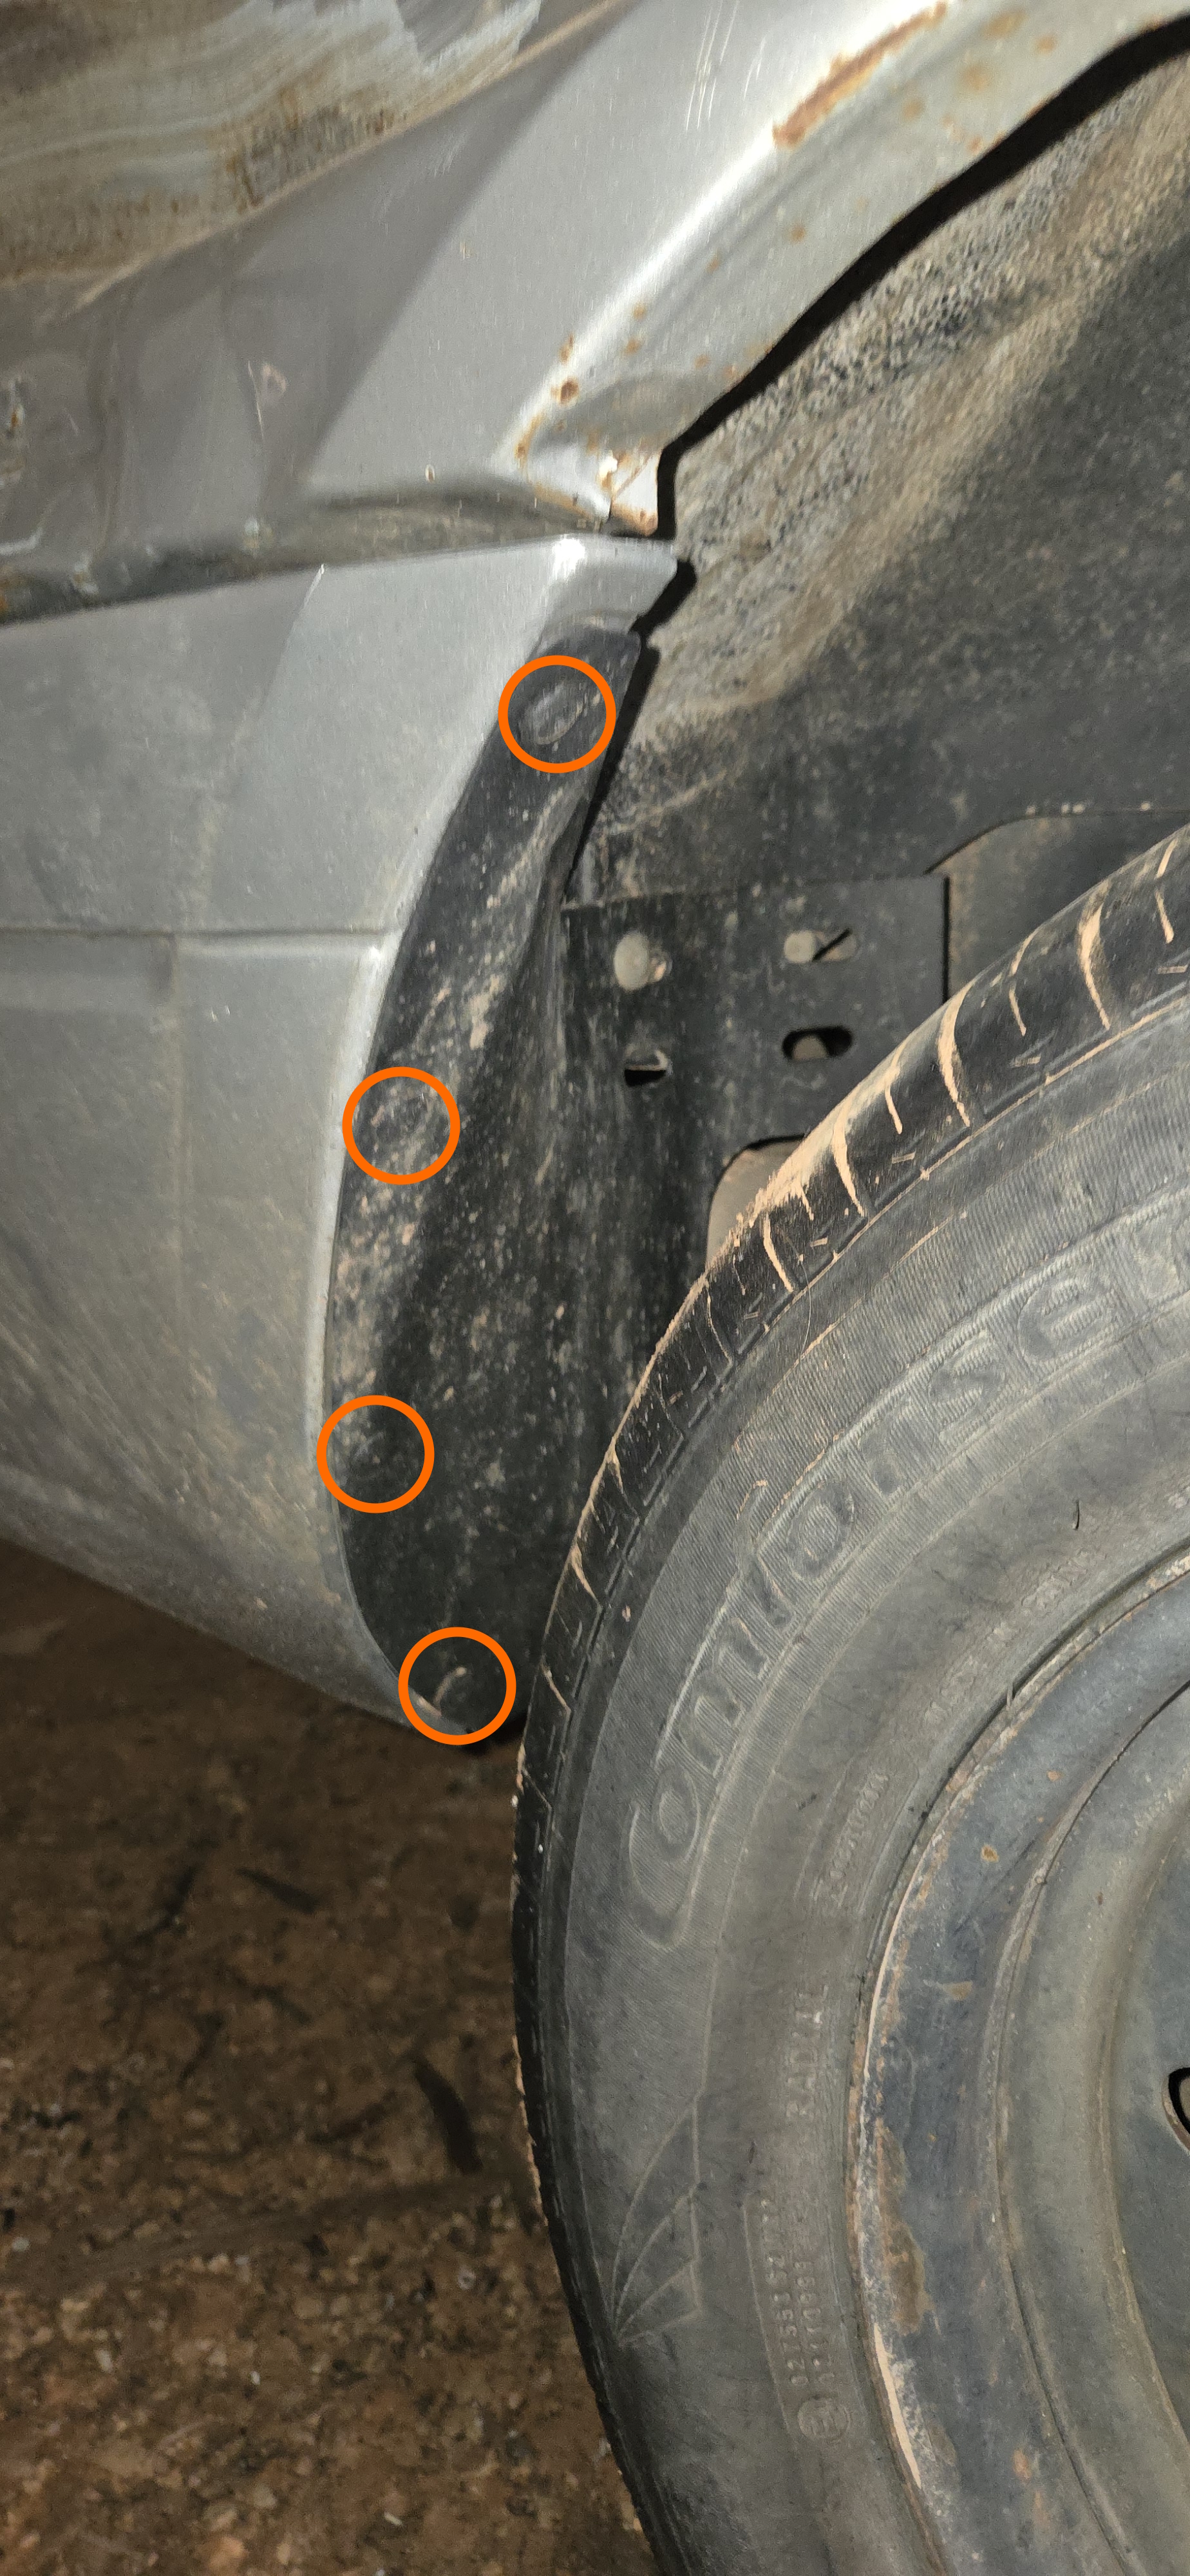
    Mudguard scrivet location driver side

    Picture of the scrivet locations on the driver side of the vehicle. The passenger side largely mirrors this layout

  2. Reaching in behind the mudguard, remove a single 13mm nut from the front end side of the bumper. Repeat this step on both sides of the vehicle
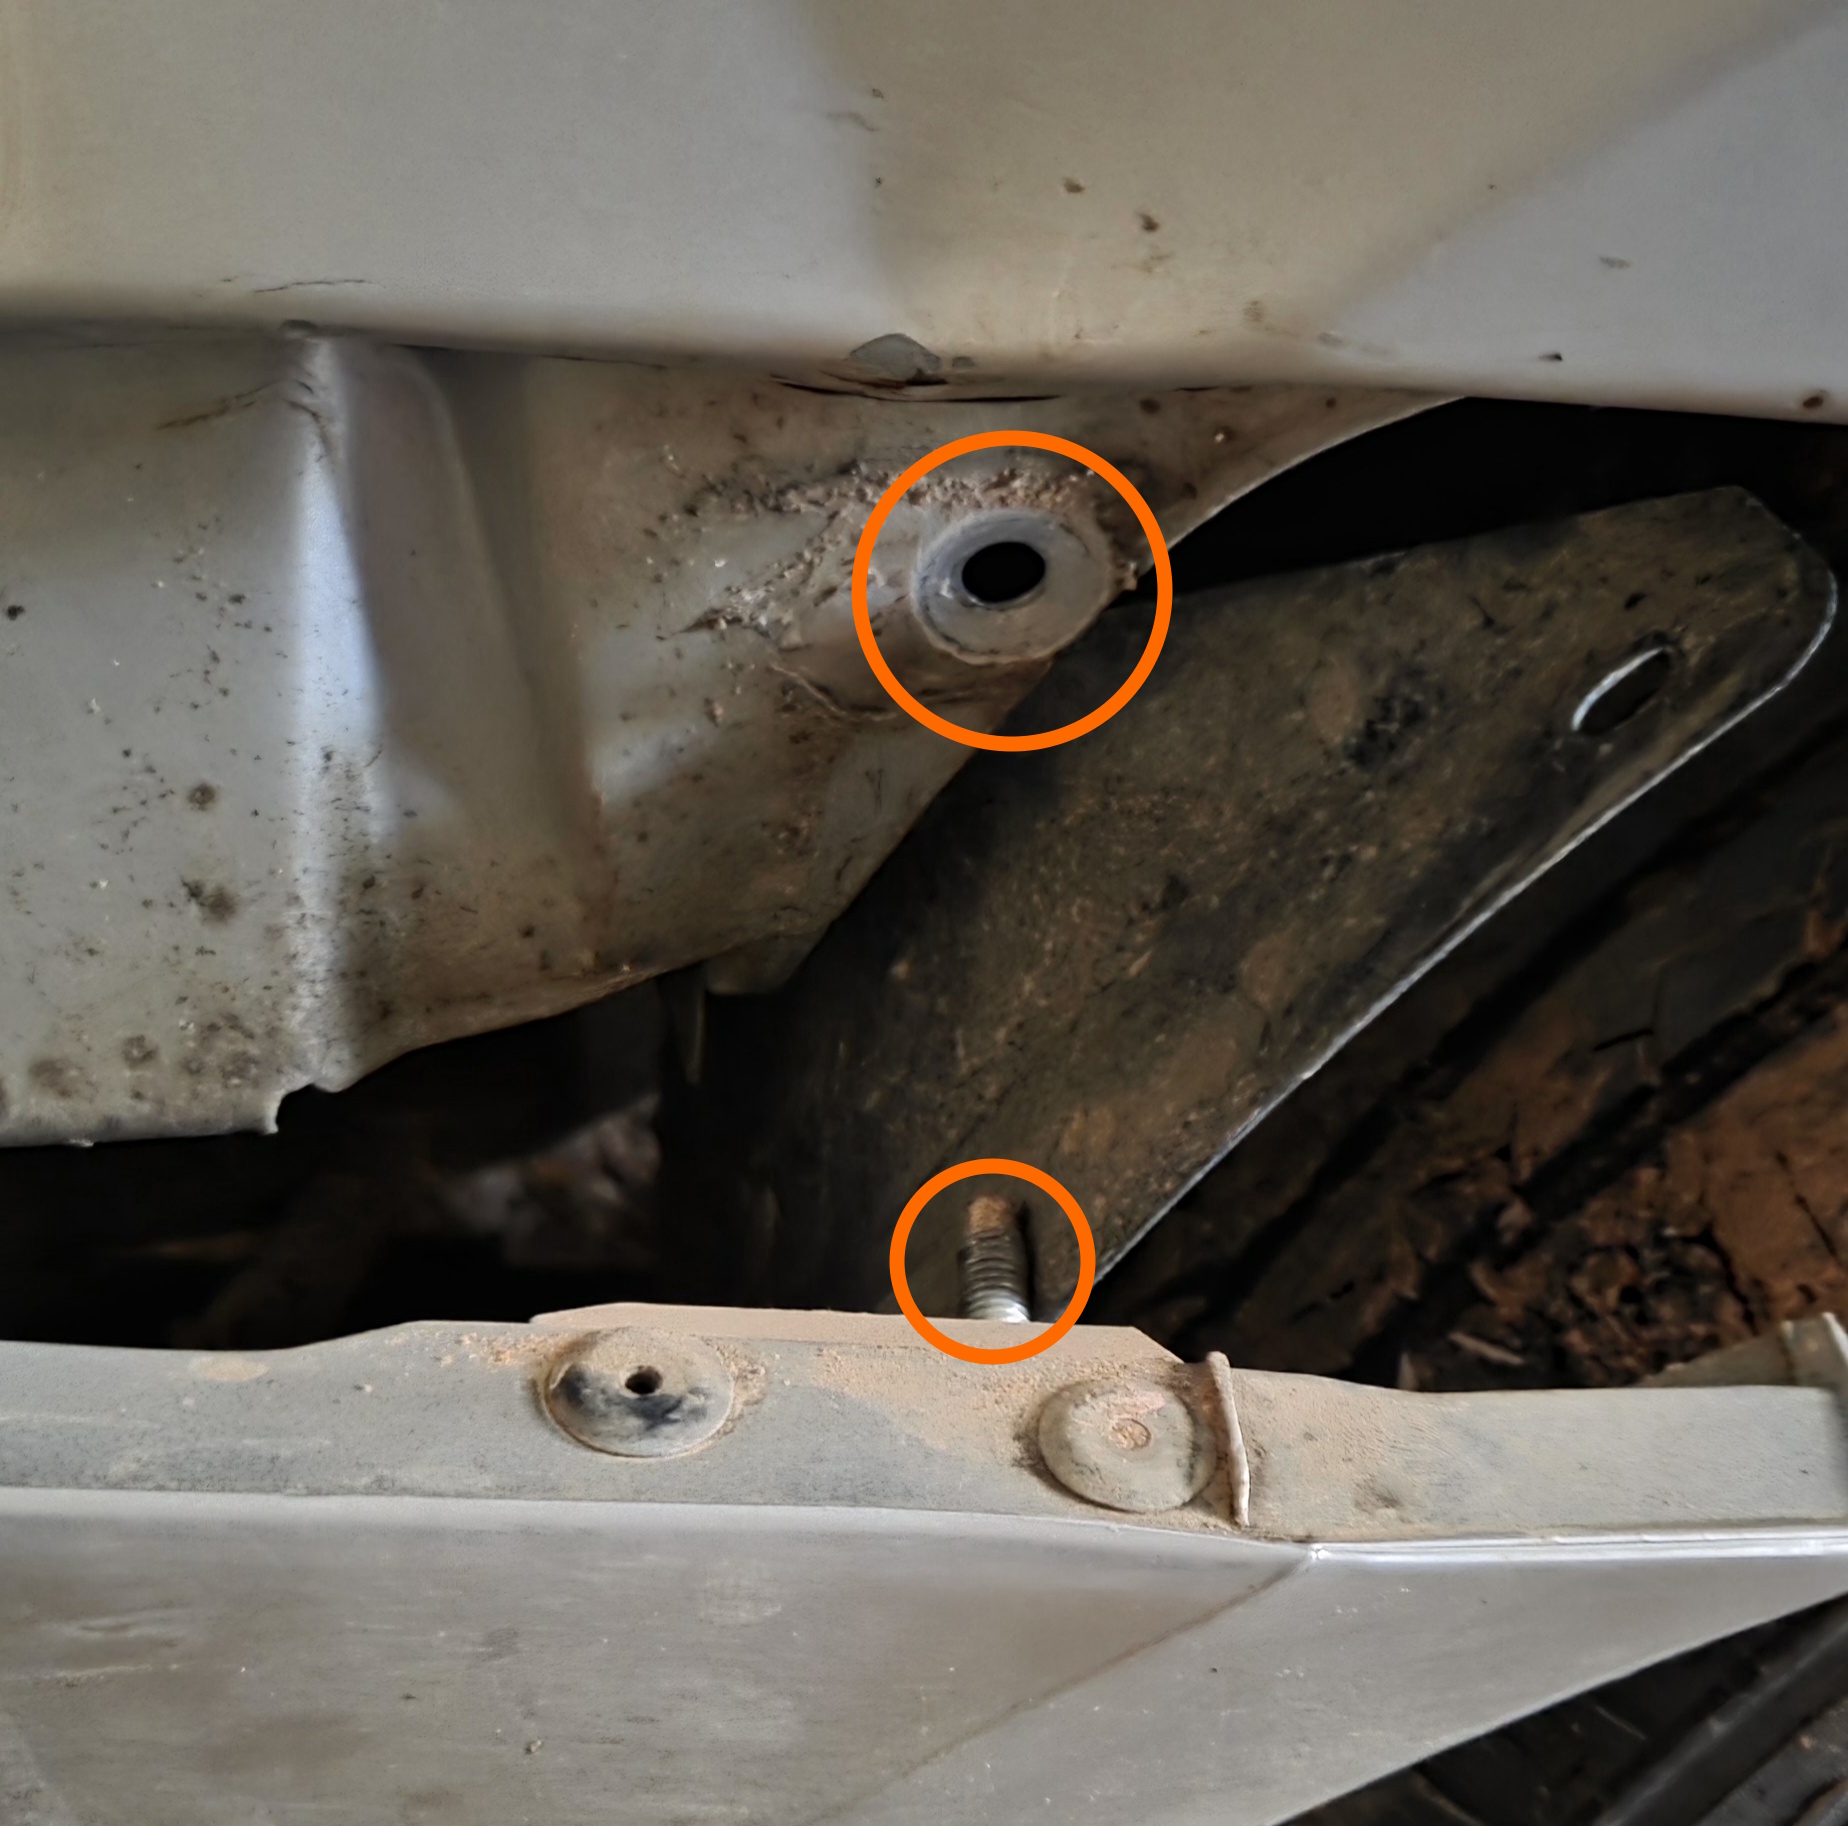
    Bumper after nut removal

    Picture of the thread on the bumper that the nut mounts to, and the hole in the sheet steel of the body that serves as a mounting point for the bumper

  3. Firmly pull the bumper outwards from the body to disengage the 2 mounting tabs holding the rest of the bumper side in. Repeat this step on both sides of the vehicle
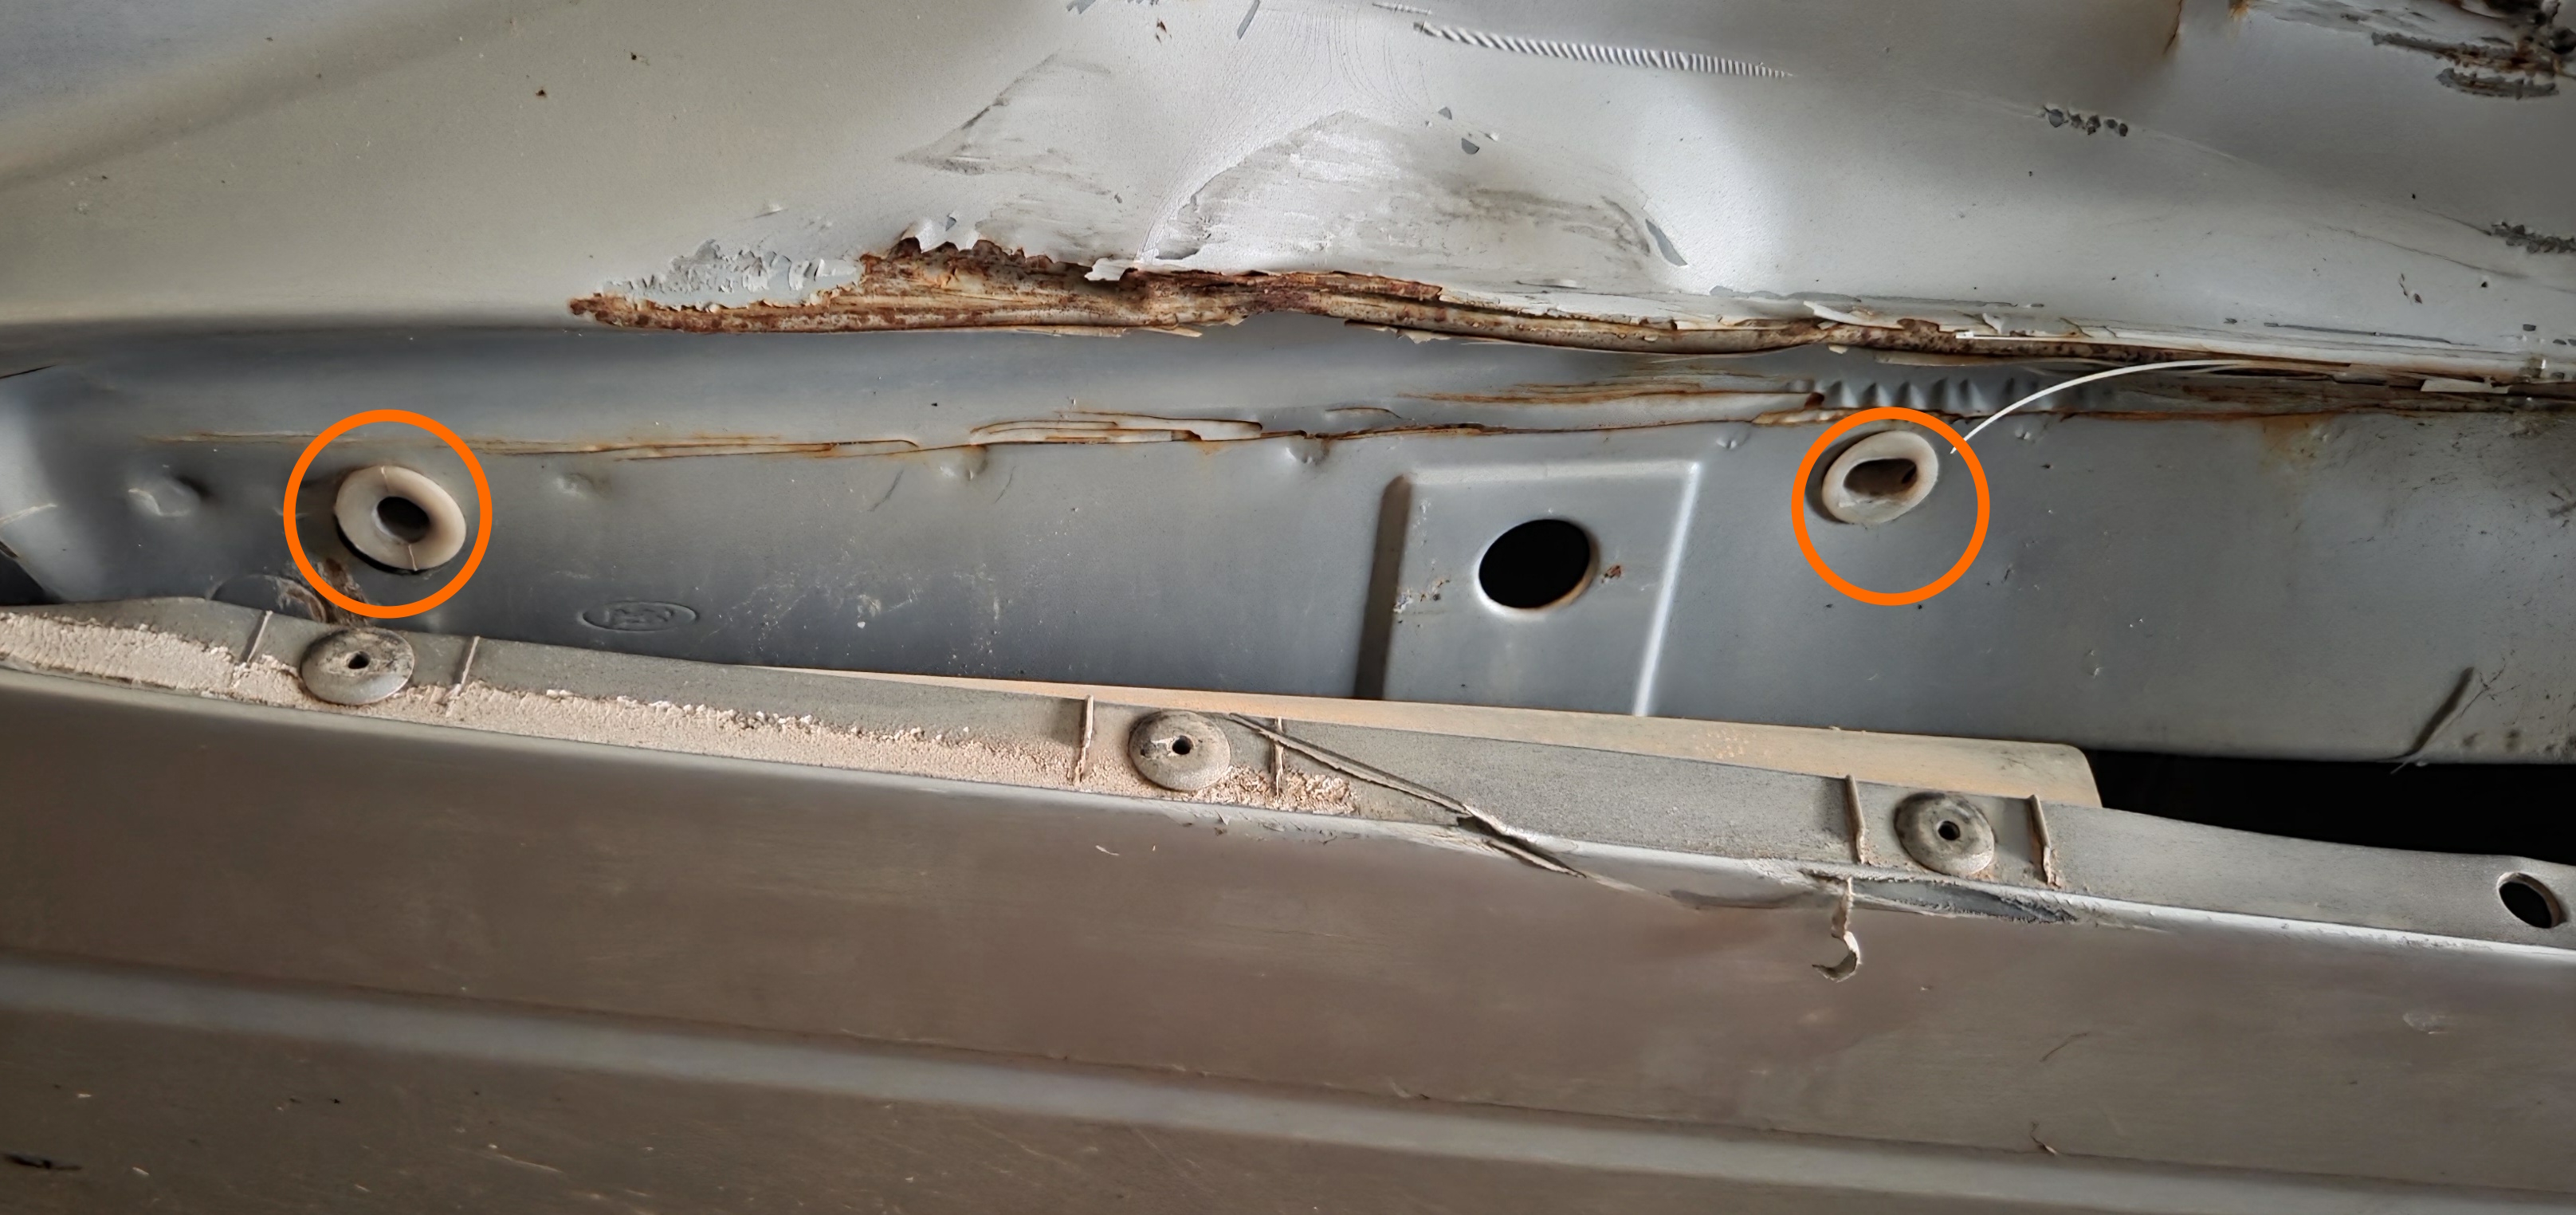
    Bumper tabs post-removal

    Picture of the mounting holes for tabs on the bumper

  4. If present, remove the trailer plug from the bumper, noting the following:
    • Factory trailer plugs (where fitted) were held in with 2 rivets and will need to be drilled to be removed
    • Non-standard or replacement trailer plugs are to be expected in this vintage of vehicle, and as such you should assess and remove on a case-by-case basis
    • If you intend to remove the entire trailer plug loom with the bumper, note that the connecting plug is located in the driver side boot panel (behind the emergency jack storage location). Also note that factory looms are attached to the body at multiple points, by cable ties and through the use of threading through holes in the body.

    No pictures provided for this step as vehicle used has a non-standard trailer plug fitted

  5. On the rear of the bumper, remove the 4 scrivets on the top surface of the bumper.

    Scrivets in this area of the car have been exposed to the elements and may prove impossible to remove non-destructively. Please ensure you have spare scrivets or another mounting solution for replacement as needed

    Bumper rear scrivets

    Picture of the scrivets on the top of the rear of the bumper

  6. On the underside of the bumper, remove the 2 phillips head screws on the passenger side (near the fuel tank)

    These screws have been exposed to the elements and will be difficult to remove (risk of stripping both the screw and the hole it’s in). Assume replacement with Self-tapping screws will be required upon replacement as needed
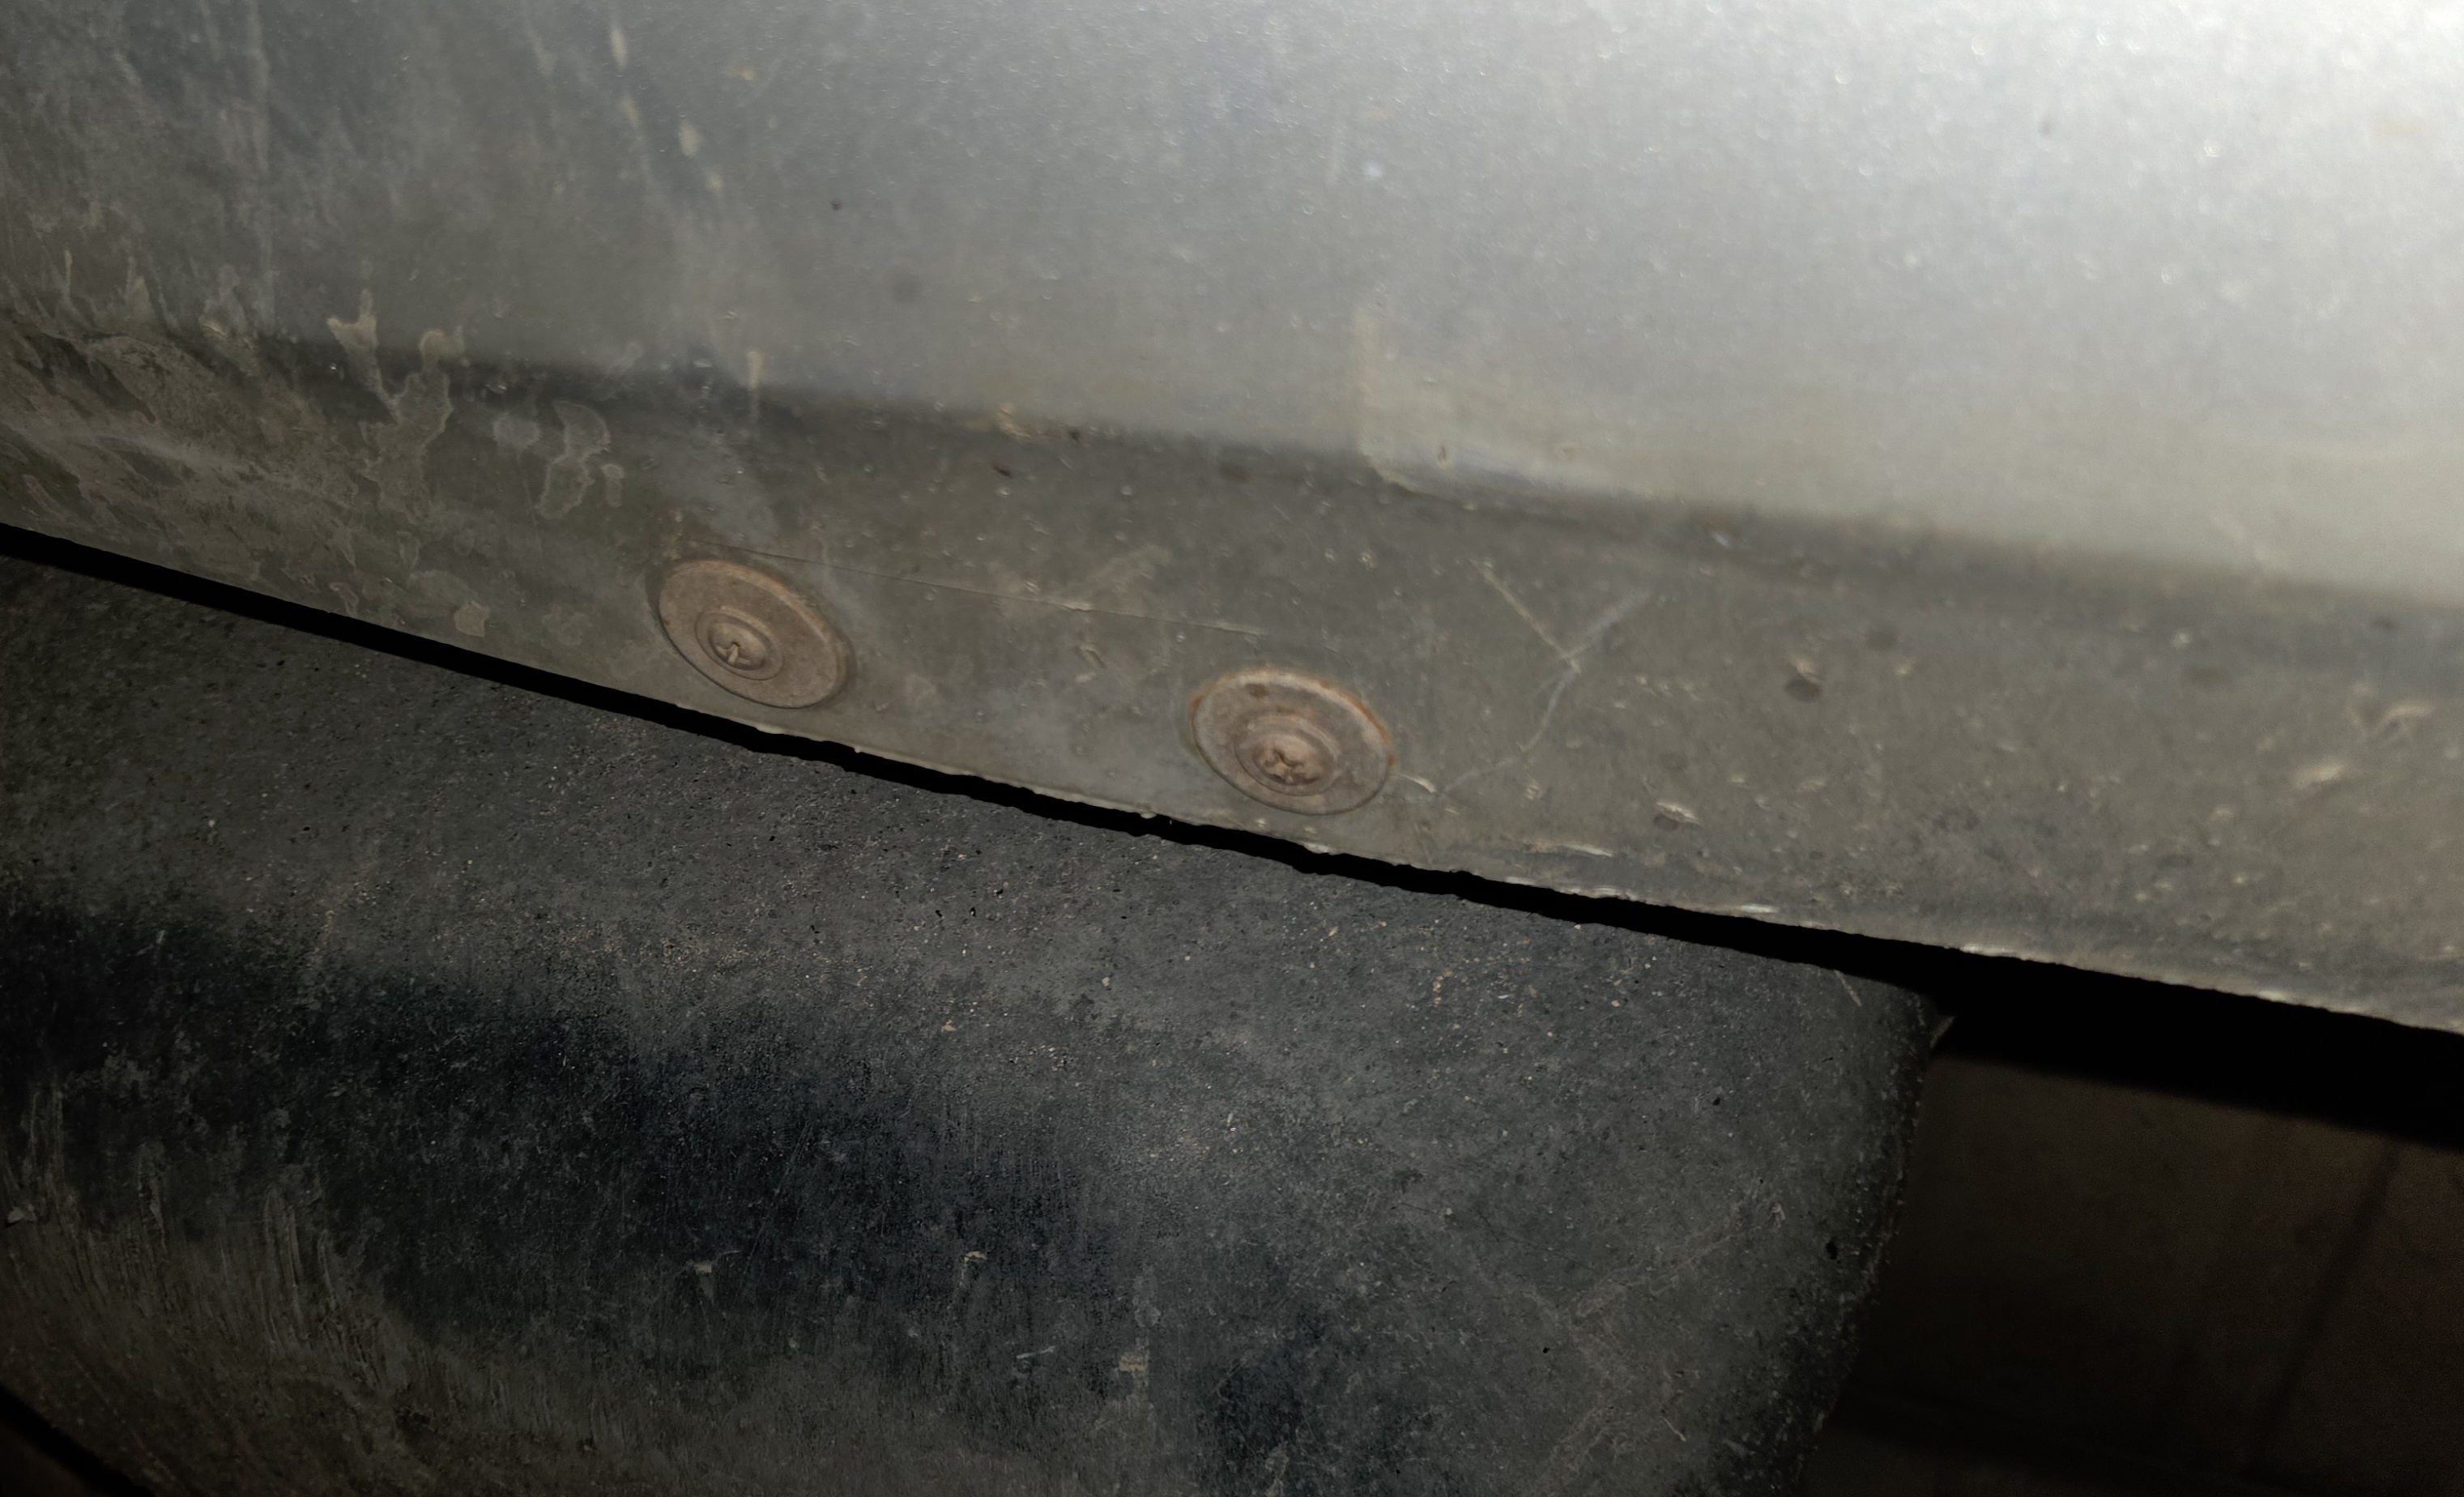
    Bumper underside screw location

    Picture of the screws on the underside of the bumper

  7. Pull the bumper from the vehicle, being careful not to use too much force to avoid risk of damage to the part

    Vehicle rear after bumper removal

    Picture of the rear of the vehicle, after the bumper has been removed

  8. To replace with another bumper, follow the above steps in reverse

  9. Done

Page printed from The AU Falcon SPUD Project, visit https://digi-ron.github.io/AU-Falcon-SPUD-Project/ for more!